Core Modules
Agentix
Digital agents that automate desktop and RPA-style tasks.
Agentix is Amantra’s Robotic Process Automation (RPA) engine. It is a desktop-based application installed directly on your system to execute defined, rule-based workflows within local applications, ensuring high-speed accuracy for structured business processes.
What Is a Digital Agent?
A digital agent is an RPA-based software entity that:
Receives a defined set of instructions.
Follows pre-programmed, rule-based sequences.
Uses local system resources and applications to execute tasks.
Reports completion or flags exceptions based on system logic.
Think of a digital agent as a dedicated software bot that works continuously on your local system, handling repetitive, structured tasks that would otherwise require manual input.
Agents vs. Workflows
Execution: Fixed, predefined steps / Rule-based, programmed sequences
Best for: Structured, repeatable processes / Repetitive, high-volume local tasks
Human oversight: Minimal once designed / Required for installation and monitoring
Examples: Data integration, report generation / Data entry, local application processing
Key Features
Rule-Oriented: Follows precise logic to complete defined tasks.
System Integration: Installs locally to interact directly with installed desktop applications.
Structured Execution: Performs high-volume tasks with consistent accuracy.
Local Management: Provides direct control over automation deployment on individual systems.
Monitoring: Full visibility into the execution status of local bot activity.
Error Handling: Automatically flags interruptions when logic constraints are met.
In This Section
Creating Agents: Configure and deploy a digital agent
Agent Pools: Group agents for scalable task distribution
Agent Monitoring: Track agent activity and performance
Creating Digital Agents
This guide walks you through setting up, connecting, and configuring a Robotic Process Automation (RPA) Digital Agent (DA) in Amantra.
Step 1: Download and Set Up the Digital Agent Application
Download the Digital Agent (DA) desktop application installer on your local device.
Complete the installation and open the application to configure the basic local settings.
Enter your Amantra platform credentials into the DA application to authenticate your connection.
Verify that the socket status displays as Connected, confirming that your local client is successfully communicating with the Amantra server.
Step 2: Utilize the Digital Agent in a Workflow
Open your workflow in the Amantra platform and add the Record & Playback activity.
Open the activity configuration panel to link your agent.
Under Select Digital Agent, choose your connected agent from the dropdown menu (typically corresponds to your username, e.g.,
miqdad.rajkotwala).
Step 3: Record Workflow Actions
Select the recording type required for your task (Excel, Desktop, or Web). If recording a web workflow, specify the Project URL and choose your preferred Browser (e.g., Chrome).
Click Start Recording. This will redirect you to the local DA application and display a running notification.
Perform the exact sequence of actions on your screen that you want the agent to automate.
End the recording session once finished. The local agent will stop and display a success notification indicating that the recording has completed successfully.
Step 4: Review and Edit Recorded Events
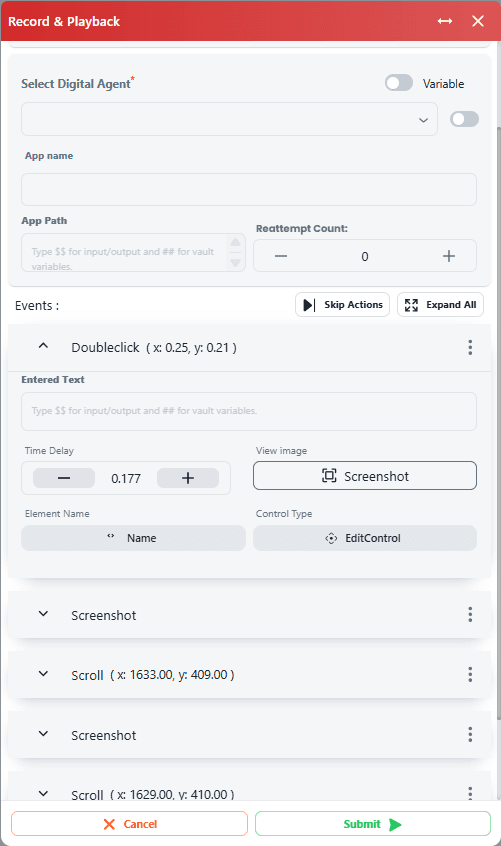
Once recorded, the sequence of actions appears directly within the Record & Playback configuration window under the Events section. You can manage, structure, and configure each captured event:
Managing Actions: Click the three-dot options menu next to any event to Add action below, Skip action, or Delete action. You can also use the inline action menu to insert specialized control steps such as taking a screenshot, managing loops, or locking/unlocking the browser.
Configuring Individual Actions: Expand any recorded event (such as a Scroll or Click action) to fine-tune its parameters:
Entered Text: Input specific text strings or map vault/input-output variables using expression syntax (e.g.,
$$for input/output and##for vault variables).Time Delay: Add a custom pause duration (in seconds) before or after the action executes using the increment/decrement controls.
View Image: Click Screenshot to inspect the captured visual state associated with the UI element.
Element Name & Control Type: Review or verify the target UI control signature identified during the recording session.
Reattempt Count: Configure failure tolerance at the activity level using the reattempt counter fields to handle transient UI delays.
Step 5: Save and Execute the Flow
Click Submit to save your configured record and playback sequence.
Execute your workflow. The connected Digital Agent will automatically perform the exact sequence of recorded actions on the target environment.
Agent Pools
Agent Pools allow you to group multiple digital agents together so work is automatically distributed across them. Pools ensure high availability and scalability, if one agent is busy, work is routed to the next available agent.
Why Use Agent Pools?
One agent gets overwhelmed with tasks: Add more agents to a pool; tasks are shared
Agent downtime causes bottlenecks: Pool maintains capacity even if one agent is offline
Uneven workload distribution: Pool policies ensure fair distribution
Creating an Agent Pool
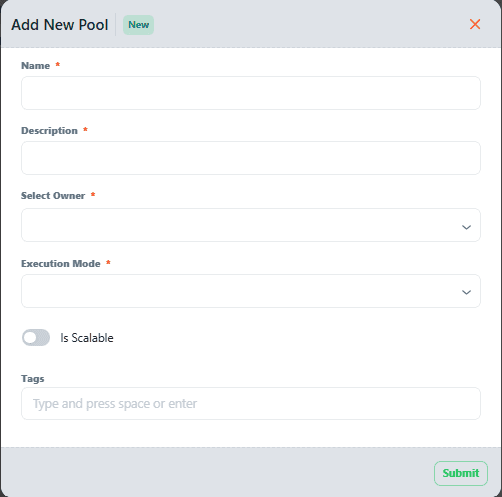
Go to Orchestrator → Agentix Pools.
Click + New Pool.
Configure the required fields:
Name: Pool name
Description: What this pool handles
Select Owner: The owner assigned to manage or oversee the pool
Execution Mode: How work is distributed (e.g., Round Robin, Load-Based, Priority)
Is Scalable: Toggle to enable or disable automatic scaling for the pool
Tags: Custom labels or keywords associated with the pool (type and press space or enter)
Click Submit.
Distribution Policies
Round Robin: Tasks are assigned to agents in rotation
Random: Tasks go to a random agent with the workload
Priority: Tasks are sorted by priority; highest-priority first
Pool Details View
Go to Agentix → Pools → [Pool Name] to open the Pool Details interface, which displays:
Agent Pool Summary Card:
Name (e.g., UNRESERVED)
Status (e.g., Enabled / Active)
Is Scalable (e.g., No)
Execution Mode (e.g., ROUND-ROBIN)
Created At timestamp (e.g., 30 Jul 2025)
Owner name
Pool Agents Table: Lists all member digital agents assigned to the pool along with their metadata:
Digital Agent: Agent username and label
Status: Current operational state (e.g., Active)
Added On: Timestamp indicating when the agent joined the pool
Actions: Option to remove agents from the pool via the delete/remove icon
Adding or Removing Agents from a Pool
Open the specific pool from the pool list view to access its Pool Details.
Click the + (Add) button next to the search bar within the Pool Agents section to add new agents, or click the remove/delete icon in the Actions column next to any listed agent to remove them.
Changes take effect immediately. Agents in the middle of a task are not interrupted.
Agent Monitoring
Amantra provides full observability into your digital agents, what they’re working on, how they’re performing, and whether they need attention.
Agent Observability Dashboard
Navigate to Administration → Agent Observability to monitor your system’s performance and execution health using the following tabs:
Traces: View detailed step-by-step execution breakdowns, including individual status, costs, latency, and specific agent attributes (e.g., model type and name).
Evaluations: Access performance benchmarks and quality assessments for your agents.
Metrics: Analyze high-level data trends and performance statistics over your selected date range.
Logs: Review comprehensive system logs to troubleshoot errors and track event history.
Additionally, you can use the Date Range filter to customize your view and the Set Alert button to configure proactive notifications.
Individual Agent Detail
Click any agent in Agentix to see:
#### Status
Active: Working on a task
Idle: Available, waiting for work
Offline: Unavailable
Error: In an error state requiring attention
#### Task History
Full log of every task the agent has handled:
Task ID and description
Start and end time
Duration
Outcome (Completed / Failed / Escalated)
Steps taken (tool calls, decisions, outputs)
#### Step-Level Trace
For any completed task, click View Trace to see a step-by-step log of every action the agent took, which tools it called, what data it processed, and what decisions it made.
Alerts and Notifications
Configure alerts so you’re notified when:
An agent fails a task
Queue depth exceeds a threshold
An agent goes offline unexpectedly
An agent escalates a task to a human
Set up alerts in Administration → Notifications.