Core Modules
Table of Content
Synapse
Workflow automation: build, connect, and run activities with Synapse.
Synapse is Amantra’s visual workflow automation engine. It enables you to design, deploy, and monitor end-to-end business processes using a drag-and-drop Designer, no coding required.
What Can You Automate with Synapse?
Synapse is designed for any repeatable, multi-step business process:
Finance: Invoice processing, purchase order approvals, expense reconciliation
HR: Employee onboarding, leave request processing, payroll validation
IT: Incident resolution, provisioning, access management
Operations: Data migration, report generation, system synchronization
Customer Service: Ticket routing, SLA monitoring, notification management
How Synapse Works
Trigger → Activities → Output
A Trigger starts the workflow (schedule, event, manual, or webhook).
The workflow runs through a sequence of Activities: Each one performing a specific action or decision.
Results are sent to downstream systems, users, or other workflows.
Key Features
Visual Designer: Drag-and-drop Designer for building workflows
Workflow Library: Centralized repository of all your workflows
Branching Logic: Switch, loops, and parallel execution
Error Handling: Retry logic, fallback paths, and exception notifications
Variable Support: Pass and transform data between activities
Real-Time Monitoring: Watch executions live, step by step
Audit Trail: Every execution is fully logged
Workflow States
Running: The workflow is currently active and executing its defined process.
Scheduled: The workflow is queued and awaiting its designated trigger time to commence.
Paused: The workflow is temporarily suspended; no new execution cycles will initiate until resumed.
Terminated: The workflow execution has been manually stopped and is no longer active.
Completed: The workflow has successfully concluded all processing tasks without interruption.
Workflow Designer
The Workflow Designer is a visual Designer where you build, edit, and test your automations. It provides a flowchart-style interface where each step in your process is represented as a connected node.
Opening the Designer
Go to Synapse in the left navigation.
Click an existing workflow to open it, or click + New Workflow to create one.
The designer opens on the Designer view.
Designer Layout
The designer has three main areas:
Designer: Where you drag, connect, and arrange activities
Activity Panel: Browse and select activities to add
Properties Panel: Configure the selected activity
Adding Activities
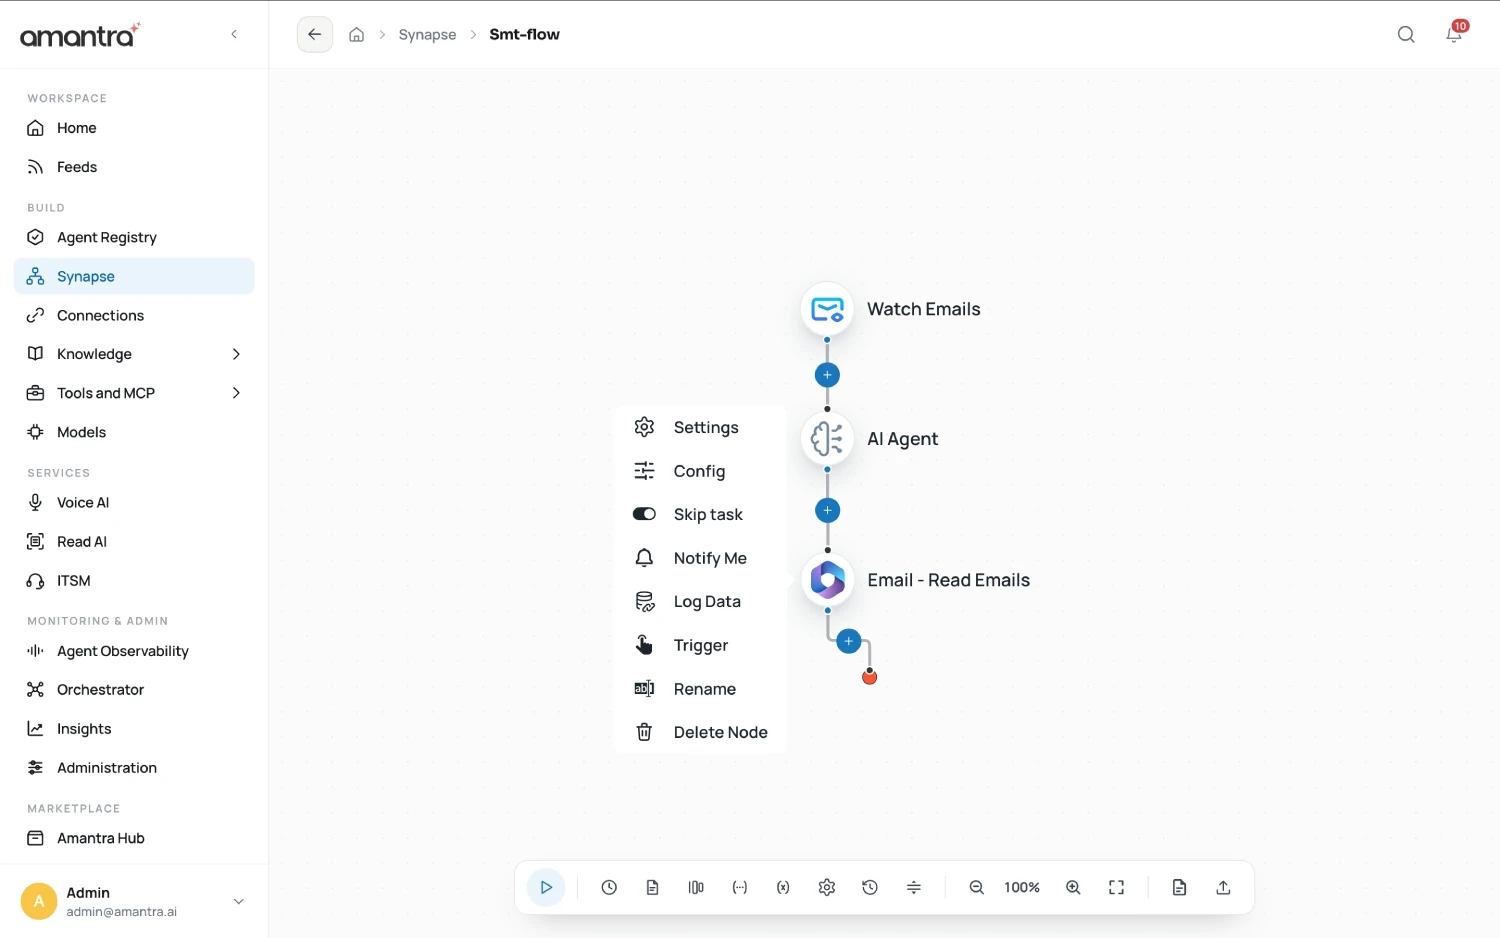
Click the + icon on any activity node on the Designer, or drag an activity from the Activity Panel.
Select the activity type.
The activity appears on the Designer connected to the previous step.
Fill in the required properties in the Properties Panel.
Connecting Activities
Activities are connected by arrows that define the execution order. To connect:
Hover over an activity’s edge. A connection point appears.
Drag from that point to the next activity.
Add conditions on connections (e.g., “run this path only if Status = Approved”).
Using Variables
Variables let you pass data between activities. For example, you might extract an invoice total from a document (ReadAI) and use that value in an approval condition.
To use a variable:
In any activity field, type
{{to open the variable picker.Select the variable from a previous step.
The value is resolved dynamically at runtime.
Variables let you pass data seamlessly between activities. Click any editable activity input field, type $$ to trigger the variable picker, and select the desired variable (e.g., a global parameter or an item generated by a previous step, such as $$mail_result). The system automatically resolves and injects the correct value at runtime.
Branching (Switch)
Add a Decision activity to split your workflow into multiple paths based on conditions.
Add a Decision node to the Designer.
Define the condition (e.g.,
Amount > 10000).Connect the True path and the False path to different subsequent activities.
Loops
Use a Loop activity to repeat a set of steps for each item in a list (e.g., process each row in a spreadsheet).
Workflow Library
The Workflow Library is your centralized repository of all automation workflows. From here you can browse, search, create, and manage every workflow in your organization.
Navigating the Library
Go to Synapse in the left navigation. The library shows all workflows you have access to, with columns for:
Name: Workflow name and description
Status: Draft, Active, Paused, or Archived
Last Modified: When the workflow was last updated
Last Execution: Date and result of the most recent run
Created By: The user who created it
Searching and Filtering
Use the search bar to find workflows by name. Use filters to narrow by:
Status (Active / Draft / Archived)
Creator
Date range
Creating a Workflow
Click + New Workflow.
Enter a name and optional description.
Click Create: You’re taken directly to the Designer.
Workflow Triggers
A Trigger defines what starts a workflow execution. Every workflow must have at least one trigger configured.
Trigger Types
Schedule Trigger
Run a workflow at a fixed time or interval.
Daily: Every day at 9:00 AM
Weekly: Every Monday at 8:00 AM
Monthly: On the 1st of every month
Custom: `0 9 * * 1-5` (weekdays at 9 AM)
To configure:
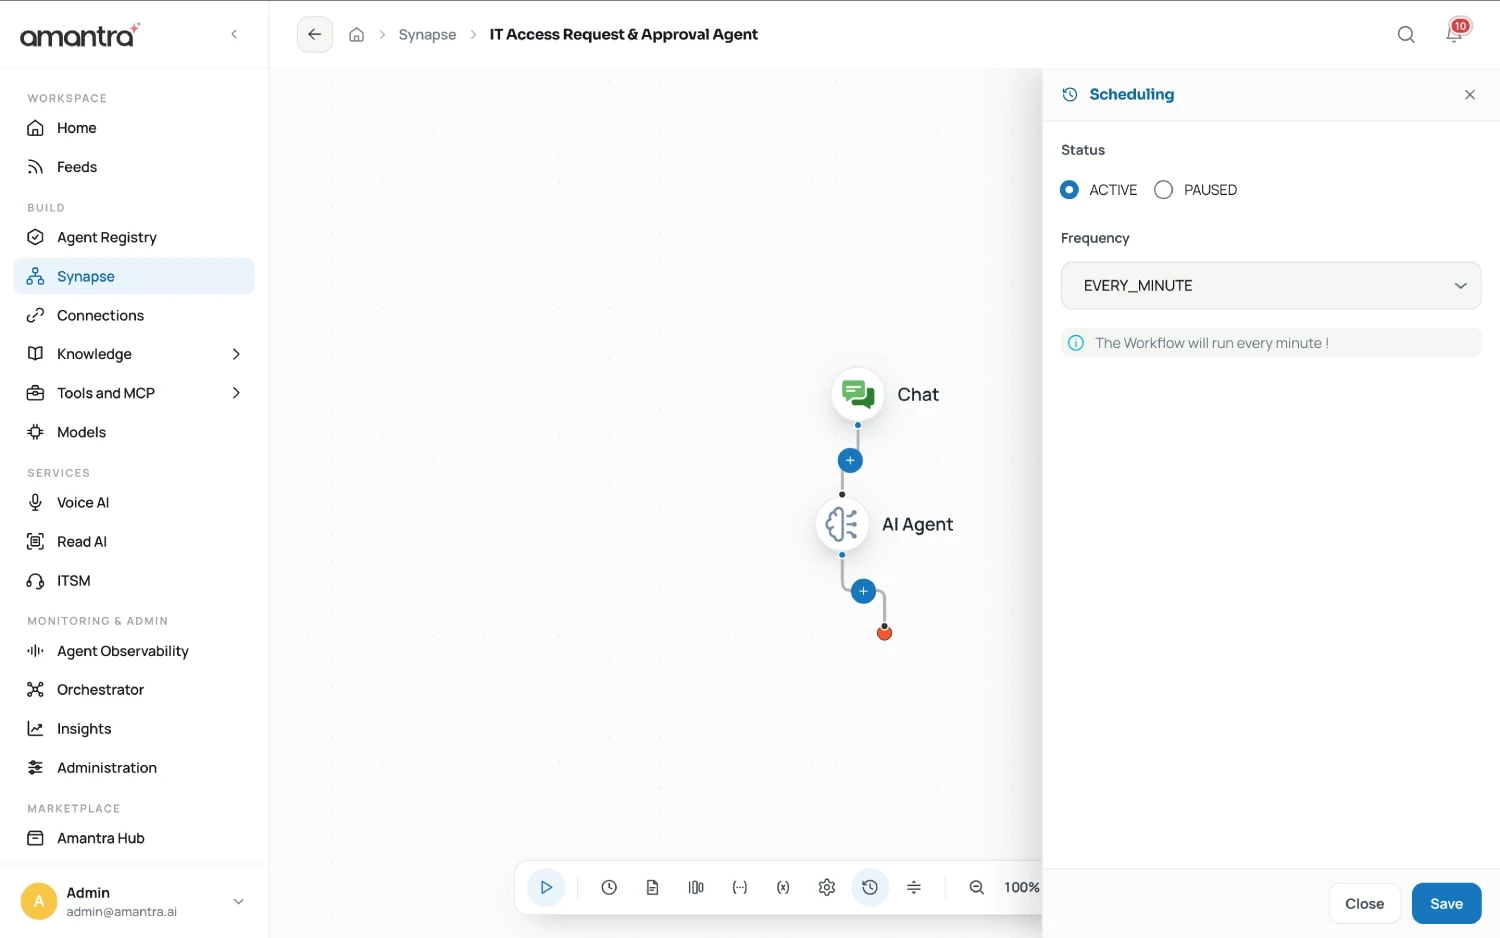
In the Designer, click Set Trigger → Schedule.
Choose frequency or enter a cron expression.
Select the timezone.

Webhook Trigger
Start a workflow when an external system sends an HTTP POST request to Amantra.
Use cases:
A CRM notifies Amantra when a new lead is created.
An e-commerce platform triggers an order fulfillment workflow.
An alert system triggers an incident response workflow.
How it works:
Click Set Trigger → Webhook.
Amantra generates a unique webhook URL.
Configure the external system to send a POST request to that URL.
Map fields from the incoming JSON payload to workflow variables.
Security: Webhook URLs can be secured with a secret token. Amantra validates the token on every incoming request.
Email Trigger
Start a workflow when an email is received that matches defined criteria.
Criteria you can match:
Sender email address
Subject line (exact match or contains)
Has attachment (Yes/No)
Specific keywords in the body
Setup:
Click Set Trigger → Email.
Select the configured email account (configured in Administration → SMTP).
Define your matching rules.
Event Trigger (Listener)
Start a workflow in response to an internal Amantra platform event, such as when another workflow completes, a case is created, or a document is uploaded.
Common events:
Workflow execution completed
New case created in Feeds
Document processed by ReadAI
Agent task completed
Manual Trigger
Start a workflow by clicking Run Now from the Workflow Library or Orchestrator. Useful for testing and for workflows that should only run on demand.
Configuring Multiple Triggers
A single workflow can have more than one trigger. For example, a report generation workflow might be triggered both on a daily schedule AND manually when a user needs an ad-hoc report.
Trigger Variables
When a trigger fires, it injects data into the workflow as trigger variables. For example:
A webhook trigger provides the full HTTP request body.
An email trigger provides the sender, subject, and attachment details.
A schedule trigger provides the current timestamp.
Access trigger variables using {{trigger.variableName}} in an activity.
Activities
Activities are the individual steps in a workflow. Each activity performs one specific action, calling an API, sending an email, making a decision, or transforming data.
Activity Categories
Data & Integration
HTTP Request: Call any REST API (GET, POST, PUT, DELETE)
Database Query: Run SQL queries against connected databases
Read File: Read content from a file or document
Write File: Write or update a file
Communication
Send Email: Send an email via configured SMTP/Exchange
Send Notification: Push in-app notifications to users
Send WhatsApp: Send messages via WhatsApp
Document Processing (ReadAI)
Extract Document: Run a document through an IDP model
Classify Document: Determine the type of an incoming document
Validate Extraction: Compare extracted data against rules
GenAI
Vector Search: Query a vector database for semantic matches
Run Custom Tool: Invoke a custom AI tool defined in GenAI
Agentic AI
Assign to Agent: Route a task to a digital agent or agent pool
Wait for Agent Result: Pause until the agent completes and return its output
Read AI
Create Incident: Open a new incident ticket
Update Ticket: Update fields on an existing Read AI ticket
Assign Ticket: Route a ticket to a user or group
Close Ticket: Mark a ticket as resolved and closed
Configuring an Activity
Add the activity to the Designer.
Click it to open the Properties Panel.
Fill in required fields. Fields marked with
*are mandatory.Use
{{variable}}syntax to reference dynamic values from previous steps.Click Save.
Error Handling
Each activity can be configured with:
Retry Count: Number of retries on failure (Default: 0, Max: 3)
Retry Delay Seconds: Time to wait before retries (Min: 60, Max: 3599)
Timeout Policy: Action to take when a timeout occurs (e.g., Time Out Workflow)
Timeout Seconds: Time after which task is marked TIMED_OUT (No timeouts if set to 0)
Response Timeout Seconds: Reschedule task if no status update (max 3600)
Time Control:
Priority: Task priority level (e.g., MEDIUM)
Task Duration: Duration value (e.g., 24)
Time Unit: Unit of time for the duration (e.g., HOURS)
Activity Results
Each activity produces an output that downstream activities can use. Output is accessed as:
For example, after an HTTP Request activity named GetUser, you can reference the response body with:

Execution Monitoring
Amantra provides full visibility into every workflow execution, past, present, and real-time.
Viewing Executions
Go to Orchestrator → Execution to see all workflow runs. You can filter by:
Workflow name
Status (Running, Completed, Failed, Queued)
Date range
Triggered by (user or system)
Additionally, you can click the execution history button directly within the Workflow Designer to access the results.

Execution Status
Running: The workflow is currently active and executing its defined process.
Scheduled: The workflow is queued and awaiting its designated trigger time to commence.
Paused: The workflow is temporarily suspended; no new execution cycles will initiate until resumed.
Terminated: The workflow execution has been manually stopped and is no longer active.
Completed: The workflow has successfully concluded all processing tasks without interruption.
Execution Detail View
Click any execution row to open the detail view:
Activity Log
See each activity in order, with:
Start and end time
Duration
Input data received
Output data produced
Error message (if failed)
Live View
For running executions, the Designer highlights the current active activity in real time. Watch your workflow progress step by step.
Terminating a Running Execution
Find the running execution in the list.
Click the ⋮ menu → Terminate.
Confirm. The execution will stop at the next activity.
In This Section
Workflow Designer: How to build workflows on the Designer
Workflow Library: Manage and organize your workflows
Triggers: How to start workflows automatically
Activities: All available activity types and how to use them
Execution Monitoring: Track and debug running workflows
Synapse is Amantra’s visual workflow automation engine. It enables you to design, deploy, and monitor end-to-end business processes using a drag-and-drop Designer, no coding required.
What Can You Automate with Synapse?
Synapse is designed for any repeatable, multi-step business process:
Finance: Invoice processing, purchase order approvals, expense reconciliation
HR: Employee onboarding, leave request processing, payroll validation
IT: Incident resolution, provisioning, access management
Operations: Data migration, report generation, system synchronization
Customer Service: Ticket routing, SLA monitoring, notification management
How Synapse Works
Trigger → Activities → Output
A Trigger starts the workflow (schedule, event, manual, or webhook).
The workflow runs through a sequence of Activities: Each one performing a specific action or decision.
Results are sent to downstream systems, users, or other workflows.
Key Features
Visual Designer: Drag-and-drop Designer for building workflows
Workflow Library: Centralized repository of all your workflows
Branching Logic: Switch, loops, and parallel execution
Error Handling: Retry logic, fallback paths, and exception notifications
Variable Support: Pass and transform data between activities
Real-Time Monitoring: Watch executions live, step by step
Audit Trail: Every execution is fully logged
Workflow States
Running: The workflow is currently active and executing its defined process.
Scheduled: The workflow is queued and awaiting its designated trigger time to commence.
Paused: The workflow is temporarily suspended; no new execution cycles will initiate until resumed.
Terminated: The workflow execution has been manually stopped and is no longer active.
Completed: The workflow has successfully concluded all processing tasks without interruption.
Workflow Designer
The Workflow Designer is a visual Designer where you build, edit, and test your automations. It provides a flowchart-style interface where each step in your process is represented as a connected node.
Opening the Designer
Go to Synapse in the left navigation.
Click an existing workflow to open it, or click + New Workflow to create one.
The designer opens on the Designer view.
Designer Layout
The designer has three main areas:
Designer: Where you drag, connect, and arrange activities
Activity Panel: Browse and select activities to add
Properties Panel: Configure the selected activity
Adding Activities
Click the + icon on any activity node on the Designer, or drag an activity from the Activity Panel.
Select the activity type.
The activity appears on the Designer connected to the previous step.
Fill in the required properties in the Properties Panel.
Connecting Activities
Activities are connected by arrows that define the execution order. To connect:
Hover over an activity’s edge. A connection point appears.
Drag from that point to the next activity.
Add conditions on connections (e.g., “run this path only if Status = Approved”).
Using Variables
Variables let you pass data between activities. For example, you might extract an invoice total from a document (ReadAI) and use that value in an approval condition.
To use a variable:
In any activity field, type
{{to open the variable picker.Select the variable from a previous step.
The value is resolved dynamically at runtime.
Variables let you pass data seamlessly between activities. Click any editable activity input field, type $$ to trigger the variable picker, and select the desired variable (e.g., a global parameter or an item generated by a previous step, such as $$mail_result). The system automatically resolves and injects the correct value at runtime.
Branching (Switch)
Add a Decision activity to split your workflow into multiple paths based on conditions.
Add a Decision node to the Designer.
Define the condition (e.g.,
Amount > 10000).Connect the True path and the False path to different subsequent activities.
Loops
Use a Loop activity to repeat a set of steps for each item in a list (e.g., process each row in a spreadsheet).
Workflow Library
The Workflow Library is your centralized repository of all automation workflows. From here you can browse, search, create, and manage every workflow in your organization.
Navigating the Library
Go to Synapse in the left navigation. The library shows all workflows you have access to, with columns for:
Name: Workflow name and description
Status: Draft, Active, Paused, or Archived
Last Modified: When the workflow was last updated
Last Execution: Date and result of the most recent run
Created By: The user who created it
Searching and Filtering
Use the search bar to find workflows by name. Use filters to narrow by:
Status (Active / Draft / Archived)
Creator
Date range
Creating a Workflow
Click + New Workflow.
Enter a name and optional description.
Click Create: You’re taken directly to the Designer.
Workflow Triggers
A Trigger defines what starts a workflow execution. Every workflow must have at least one trigger configured.
Trigger Types
Schedule Trigger
Run a workflow at a fixed time or interval.
Daily: Every day at 9:00 AM
Weekly: Every Monday at 8:00 AM
Monthly: On the 1st of every month
Custom: `0 9 * * 1-5` (weekdays at 9 AM)
To configure:
In the Designer, click Set Trigger → Schedule.
Choose frequency or enter a cron expression.
Select the timezone.
Webhook Trigger
Start a workflow when an external system sends an HTTP POST request to Amantra.
Use cases:
A CRM notifies Amantra when a new lead is created.
An e-commerce platform triggers an order fulfillment workflow.
An alert system triggers an incident response workflow.
How it works:
Click Set Trigger → Webhook.
Amantra generates a unique webhook URL.
Configure the external system to send a POST request to that URL.
Map fields from the incoming JSON payload to workflow variables.
Security: Webhook URLs can be secured with a secret token. Amantra validates the token on every incoming request.
Email Trigger
Start a workflow when an email is received that matches defined criteria.
Criteria you can match:
Sender email address
Subject line (exact match or contains)
Has attachment (Yes/No)
Specific keywords in the body
Setup:
Click Set Trigger → Email.
Select the configured email account (configured in Administration → SMTP).
Define your matching rules.
Event Trigger (Listener)
Start a workflow in response to an internal Amantra platform event, such as when another workflow completes, a case is created, or a document is uploaded.
Common events:
Workflow execution completed
New case created in Feeds
Document processed by ReadAI
Agent task completed
Manual Trigger
Start a workflow by clicking Run Now from the Workflow Library or Orchestrator. Useful for testing and for workflows that should only run on demand.
Configuring Multiple Triggers
A single workflow can have more than one trigger. For example, a report generation workflow might be triggered both on a daily schedule AND manually when a user needs an ad-hoc report.
Trigger Variables
When a trigger fires, it injects data into the workflow as trigger variables. For example:
A webhook trigger provides the full HTTP request body.
An email trigger provides the sender, subject, and attachment details.
A schedule trigger provides the current timestamp.
Access trigger variables using {{trigger.variableName}} in an activity.
Activities
Activities are the individual steps in a workflow. Each activity performs one specific action, calling an API, sending an email, making a decision, or transforming data.
Activity Categories
Data & Integration
HTTP Request: Call any REST API (GET, POST, PUT, DELETE)
Database Query: Run SQL queries against connected databases
Read File: Read content from a file or document
Write File: Write or update a file
Communication
Send Email: Send an email via configured SMTP/Exchange
Send Notification: Push in-app notifications to users
Send WhatsApp: Send messages via WhatsApp
Document Processing (ReadAI)
Extract Document: Run a document through an IDP model
Classify Document: Determine the type of an incoming document
Validate Extraction: Compare extracted data against rules
GenAI
Vector Search: Query a vector database for semantic matches
Run Custom Tool: Invoke a custom AI tool defined in GenAI
Agentic AI
Assign to Agent: Route a task to a digital agent or agent pool
Wait for Agent Result: Pause until the agent completes and return its output
Read AI
Create Incident: Open a new incident ticket
Update Ticket: Update fields on an existing Read AI ticket
Assign Ticket: Route a ticket to a user or group
Close Ticket: Mark a ticket as resolved and closed
Configuring an Activity
Add the activity to the Designer.
Click it to open the Properties Panel.
Fill in required fields. Fields marked with
*are mandatory.Use
{{variable}}syntax to reference dynamic values from previous steps.Click Save.
Error Handling
Each activity can be configured with:
Retry Count: Number of retries on failure (Default: 0, Max: 3)
Retry Delay Seconds: Time to wait before retries (Min: 60, Max: 3599)
Timeout Policy: Action to take when a timeout occurs (e.g., Time Out Workflow)
Timeout Seconds: Time after which task is marked TIMED_OUT (No timeouts if set to 0)
Response Timeout Seconds: Reschedule task if no status update (max 3600)
Time Control:
Priority: Task priority level (e.g., MEDIUM)
Task Duration: Duration value (e.g., 24)
Time Unit: Unit of time for the duration (e.g., HOURS)
Activity Results
Each activity produces an output that downstream activities can use. Output is accessed as:
For example, after an HTTP Request activity named GetUser, you can reference the response body with:
Execution Monitoring
Amantra provides full visibility into every workflow execution, past, present, and real-time.
Viewing Executions
Go to Orchestrator → Execution to see all workflow runs. You can filter by:
Workflow name
Status (Running, Completed, Failed, Queued)
Date range
Triggered by (user or system)
Additionally, you can click the execution history button directly within the Workflow Designer to access the results.
Execution Status
Running: The workflow is currently active and executing its defined process.
Scheduled: The workflow is queued and awaiting its designated trigger time to commence.
Paused: The workflow is temporarily suspended; no new execution cycles will initiate until resumed.
Terminated: The workflow execution has been manually stopped and is no longer active.
Completed: The workflow has successfully concluded all processing tasks without interruption.
Execution Detail View
Click any execution row to open the detail view:
Activity Log
See each activity in order, with:
Start and end time
Duration
Input data received
Output data produced
Error message (if failed)
Live View
For running executions, the Designer highlights the current active activity in real time. Watch your workflow progress step by step.
Terminating a Running Execution
Find the running execution in the list.
Click the ⋮ menu → Terminate.
Confirm. The execution will stop at the next activity.
In This Section
Workflow Designer: How to build workflows on the Designer
Workflow Library: Manage and organize your workflows
Triggers: How to start workflows automatically
Activities: All available activity types and how to use them
Execution Monitoring: Track and debug running workflows
Synapse is Amantra’s visual workflow automation engine. It enables you to design, deploy, and monitor end-to-end business processes using a drag-and-drop Designer, no coding required.
What Can You Automate with Synapse?
Synapse is designed for any repeatable, multi-step business process:
Finance: Invoice processing, purchase order approvals, expense reconciliation
HR: Employee onboarding, leave request processing, payroll validation
IT: Incident resolution, provisioning, access management
Operations: Data migration, report generation, system synchronization
Customer Service: Ticket routing, SLA monitoring, notification management
How Synapse Works
Trigger → Activities → Output
A Trigger starts the workflow (schedule, event, manual, or webhook).
The workflow runs through a sequence of Activities: Each one performing a specific action or decision.
Results are sent to downstream systems, users, or other workflows.
Key Features
Visual Designer: Drag-and-drop Designer for building workflows
Workflow Library: Centralized repository of all your workflows
Branching Logic: Switch, loops, and parallel execution
Error Handling: Retry logic, fallback paths, and exception notifications
Variable Support: Pass and transform data between activities
Real-Time Monitoring: Watch executions live, step by step
Audit Trail: Every execution is fully logged
Workflow States
Running: The workflow is currently active and executing its defined process.
Scheduled: The workflow is queued and awaiting its designated trigger time to commence.
Paused: The workflow is temporarily suspended; no new execution cycles will initiate until resumed.
Terminated: The workflow execution has been manually stopped and is no longer active.
Completed: The workflow has successfully concluded all processing tasks without interruption.
Workflow Designer
The Workflow Designer is a visual Designer where you build, edit, and test your automations. It provides a flowchart-style interface where each step in your process is represented as a connected node.
Opening the Designer
Go to Synapse in the left navigation.
Click an existing workflow to open it, or click + New Workflow to create one.
The designer opens on the Designer view.
Designer Layout
The designer has three main areas:
Designer: Where you drag, connect, and arrange activities
Activity Panel: Browse and select activities to add
Properties Panel: Configure the selected activity
Adding Activities
Click the + icon on any activity node on the Designer, or drag an activity from the Activity Panel.
Select the activity type.
The activity appears on the Designer connected to the previous step.
Fill in the required properties in the Properties Panel.
Connecting Activities
Activities are connected by arrows that define the execution order. To connect:
Hover over an activity’s edge. A connection point appears.
Drag from that point to the next activity.
Add conditions on connections (e.g., “run this path only if Status = Approved”).
Using Variables
Variables let you pass data between activities. For example, you might extract an invoice total from a document (ReadAI) and use that value in an approval condition.
To use a variable:
In any activity field, type
{{to open the variable picker.Select the variable from a previous step.
The value is resolved dynamically at runtime.
Variables let you pass data seamlessly between activities. Click any editable activity input field, type $$ to trigger the variable picker, and select the desired variable (e.g., a global parameter or an item generated by a previous step, such as $$mail_result). The system automatically resolves and injects the correct value at runtime.
Branching (Switch)
Add a Decision activity to split your workflow into multiple paths based on conditions.
Add a Decision node to the Designer.
Define the condition (e.g.,
Amount > 10000).Connect the True path and the False path to different subsequent activities.
Loops
Use a Loop activity to repeat a set of steps for each item in a list (e.g., process each row in a spreadsheet).
Workflow Library
The Workflow Library is your centralized repository of all automation workflows. From here you can browse, search, create, and manage every workflow in your organization.
Navigating the Library
Go to Synapse in the left navigation. The library shows all workflows you have access to, with columns for:
Name: Workflow name and description
Status: Draft, Active, Paused, or Archived
Last Modified: When the workflow was last updated
Last Execution: Date and result of the most recent run
Created By: The user who created it
Searching and Filtering
Use the search bar to find workflows by name. Use filters to narrow by:
Status (Active / Draft / Archived)
Creator
Date range
Creating a Workflow
Click + New Workflow.
Enter a name and optional description.
Click Create: You’re taken directly to the Designer.
Workflow Triggers
A Trigger defines what starts a workflow execution. Every workflow must have at least one trigger configured.
Trigger Types
Schedule Trigger
Run a workflow at a fixed time or interval.
Daily: Every day at 9:00 AM
Weekly: Every Monday at 8:00 AM
Monthly: On the 1st of every month
Custom: `0 9 * * 1-5` (weekdays at 9 AM)
To configure:
In the Designer, click Set Trigger → Schedule.
Choose frequency or enter a cron expression.
Select the timezone.
Webhook Trigger
Start a workflow when an external system sends an HTTP POST request to Amantra.
Use cases:
A CRM notifies Amantra when a new lead is created.
An e-commerce platform triggers an order fulfillment workflow.
An alert system triggers an incident response workflow.
How it works:
Click Set Trigger → Webhook.
Amantra generates a unique webhook URL.
Configure the external system to send a POST request to that URL.
Map fields from the incoming JSON payload to workflow variables.
Security: Webhook URLs can be secured with a secret token. Amantra validates the token on every incoming request.
Email Trigger
Start a workflow when an email is received that matches defined criteria.
Criteria you can match:
Sender email address
Subject line (exact match or contains)
Has attachment (Yes/No)
Specific keywords in the body
Setup:
Click Set Trigger → Email.
Select the configured email account (configured in Administration → SMTP).
Define your matching rules.
Event Trigger (Listener)
Start a workflow in response to an internal Amantra platform event, such as when another workflow completes, a case is created, or a document is uploaded.
Common events:
Workflow execution completed
New case created in Feeds
Document processed by ReadAI
Agent task completed
Manual Trigger
Start a workflow by clicking Run Now from the Workflow Library or Orchestrator. Useful for testing and for workflows that should only run on demand.
Configuring Multiple Triggers
A single workflow can have more than one trigger. For example, a report generation workflow might be triggered both on a daily schedule AND manually when a user needs an ad-hoc report.
Trigger Variables
When a trigger fires, it injects data into the workflow as trigger variables. For example:
A webhook trigger provides the full HTTP request body.
An email trigger provides the sender, subject, and attachment details.
A schedule trigger provides the current timestamp.
Access trigger variables using {{trigger.variableName}} in an activity.
Activities
Activities are the individual steps in a workflow. Each activity performs one specific action, calling an API, sending an email, making a decision, or transforming data.
Activity Categories
Data & Integration
HTTP Request: Call any REST API (GET, POST, PUT, DELETE)
Database Query: Run SQL queries against connected databases
Read File: Read content from a file or document
Write File: Write or update a file
Communication
Send Email: Send an email via configured SMTP/Exchange
Send Notification: Push in-app notifications to users
Send WhatsApp: Send messages via WhatsApp
Document Processing (ReadAI)
Extract Document: Run a document through an IDP model
Classify Document: Determine the type of an incoming document
Validate Extraction: Compare extracted data against rules
GenAI
Vector Search: Query a vector database for semantic matches
Run Custom Tool: Invoke a custom AI tool defined in GenAI
Agentic AI
Assign to Agent: Route a task to a digital agent or agent pool
Wait for Agent Result: Pause until the agent completes and return its output
Read AI
Create Incident: Open a new incident ticket
Update Ticket: Update fields on an existing Read AI ticket
Assign Ticket: Route a ticket to a user or group
Close Ticket: Mark a ticket as resolved and closed
Configuring an Activity
Add the activity to the Designer.
Click it to open the Properties Panel.
Fill in required fields. Fields marked with
*are mandatory.Use
{{variable}}syntax to reference dynamic values from previous steps.Click Save.
Error Handling
Each activity can be configured with:
Retry Count: Number of retries on failure (Default: 0, Max: 3)
Retry Delay Seconds: Time to wait before retries (Min: 60, Max: 3599)
Timeout Policy: Action to take when a timeout occurs (e.g., Time Out Workflow)
Timeout Seconds: Time after which task is marked TIMED_OUT (No timeouts if set to 0)
Response Timeout Seconds: Reschedule task if no status update (max 3600)
Time Control:
Priority: Task priority level (e.g., MEDIUM)
Task Duration: Duration value (e.g., 24)
Time Unit: Unit of time for the duration (e.g., HOURS)
Activity Results
Each activity produces an output that downstream activities can use. Output is accessed as:
For example, after an HTTP Request activity named GetUser, you can reference the response body with:
Execution Monitoring
Amantra provides full visibility into every workflow execution, past, present, and real-time.
Viewing Executions
Go to Orchestrator → Execution to see all workflow runs. You can filter by:
Workflow name
Status (Running, Completed, Failed, Queued)
Date range
Triggered by (user or system)
Additionally, you can click the execution history button directly within the Workflow Designer to access the results.
Execution Status
Running: The workflow is currently active and executing its defined process.
Scheduled: The workflow is queued and awaiting its designated trigger time to commence.
Paused: The workflow is temporarily suspended; no new execution cycles will initiate until resumed.
Terminated: The workflow execution has been manually stopped and is no longer active.
Completed: The workflow has successfully concluded all processing tasks without interruption.
Execution Detail View
Click any execution row to open the detail view:
Activity Log
See each activity in order, with:
Start and end time
Duration
Input data received
Output data produced
Error message (if failed)
Live View
For running executions, the Designer highlights the current active activity in real time. Watch your workflow progress step by step.
Terminating a Running Execution
Find the running execution in the list.
Click the ⋮ menu → Terminate.
Confirm. The execution will stop at the next activity.
In This Section
Workflow Designer: How to build workflows on the Designer
Workflow Library: Manage and organize your workflows
Triggers: How to start workflows automatically
Activities: All available activity types and how to use them
Execution Monitoring: Track and debug running workflows